


How to Create a Custom Appearance in SOLIDWORKS

Article by Griffin Pacey updated July 8, 2026
Article
Using an appearance in SOLIDWORKS is a simple way to enhance the quality of your models. Learning how to create and apply a custom appearance in SOLIDWORKS makes your models look as realistic as possible.
What is a Custom Appearance in SOLIDWORKS?
Custom appearances in SOLIDWORKS enable you to apply your choice of colors and textures to any face, feature, or body. You can also alter qualities of the appearance, such as transparency, iridescence, illumination, and more.
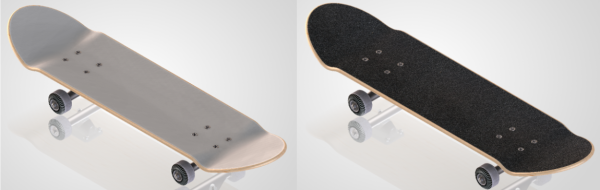
A skateboard with a custom appearance applied
How to Create a Custom Appearance in SOLIDWORKS
This step-by-step guide will give you an outline for creating your own custom appearance in SOLIDWORKS, so you can have realistic models.
- Find a high-resolution image of the material needed for your SOLIDWORKS model.

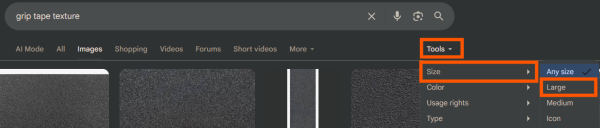 Select Large for the best outcomes
 - Create a folder named “Custom Appearances” in the default SOLIDWORKS Materials file path.
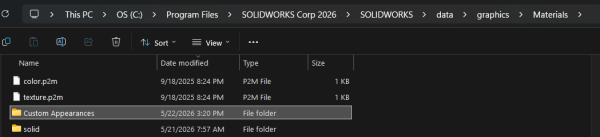 A new Custom Appearances folder
 - Add the appearance file to SOLIDWORKS and process it through the Edit Appearance tool from the SOLIDWORKS Heads-Up View toolbar.
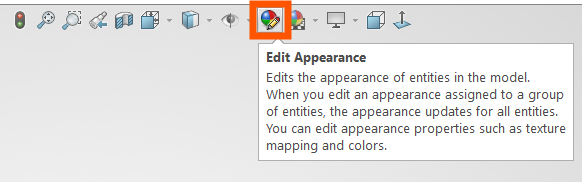 Editing an appearance in SOLIDWORKS
 - Once the Edit Appearance tool is open, select the Advanced tab and click on the Browse button under the Appearance file path bar.
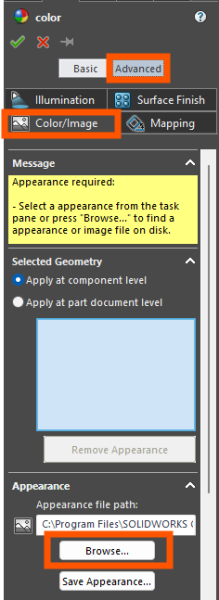 Selecting the downloaded appearance image
 - Open the appearance image saved in Step 1.
- SOLIDWORKS will prompt you to save a .p2m file. Save this in the Custom Appearances folder you made in Step 2.
- Select the parts of the surfaces you would like to apply the appearance to.
Final Adjustments with the Mapping Tool
If you have applied a custom appearance that looks stretched or warped, you can adjust it with the Mapping tool in the Edit Appearance command.
- Right-click on your newly applied appearance and select the Edit Appearance feature icon.
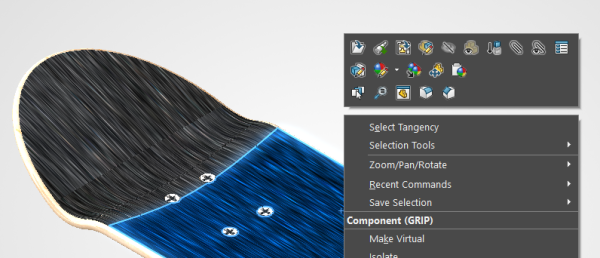 Right-click the surface of the appearance and select the Edit Appearance icon
 - Select the Advanced tab in the PropertyManager and open the Mapping section.
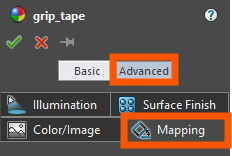 Navigating to the appearance mapping options
 - Expand the second Mapping section.
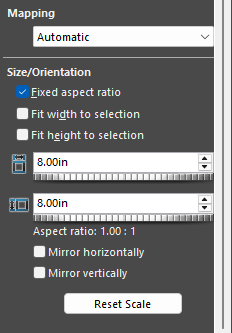 SOLIDWORKS appearance mapping options
 - Adjust the options to specify direction, aspect ratio, or mirroring to reorient the appearance.
Automatic mapping is usually a good starting point, but you may need to use another mapping type depending on your geometry. SOLIDWORKS provides a few different options for mapping type.
- Automatic: Maps to one of the X, Y, and Z axes. The Automatic texture space option is appropriate for most planar geometries.
- Surface: Maps all points based on the UV texture coordinates of the model.
- Projection: Maps all points based on a projection direction.
- Spherical: Maps all points onto the surface of a sphere.
- Cylindrical: Maps all points onto a cylinder.
Customizing More Than SOLIDWORKS Appearances
By mastering custom appearances and mapping techniques, you can eliminate distortions and ensure every detail reflects your design intent. These small adjustments can make a significant difference in presentations, client reviews, and overall model quality. Invest time in refining your visuals, and your designs will stand out with clarity, professionalism, and impact.
SOLIDWORKS has an incredible amount of customizations, allowing you to tailor the interface, mouse gestures, and keyboard shortcuts to match your day-to-day workflows.
Related Links
Certified SOLIDWORKS Services available from Javelin
Javelin can help you to:
Posts related to 'How to Create a Custom Appearance in SOLIDWORKS'
